Plan & Record the Video
1 Study Presentation Best Practices
Get inspired and learn best practices by by observing successful speakers and watching tutorials, such as The University of Melbourne's three-part overview (part 1 | part 2 | part 3) on academic presentations. The Univeristy of Queensland's 3MT (Three Minute Thesis) website offers award-winning research talks.
Another excellent resource for examples of succinct but inspiring presentations is the TED Talks YouTube Channel. Presentation expert Nancy Duarte's TEDx Talk on The Secret Structure of Great Presentations will be particularly useful in learning to create effective and eloquent presentations.
2 Write a Script
Unless your video is purposely improvised, it is best to prepare what you will say in advance. You may wish to display your script or talking points on our TV monitor. For the latter option, remember to indicate that you need the presentation clicker and a laptop if you do not have a laptop of your own.
You may also want to use the teleprompter which allows you to follow your “rolling“ text. Remember to email the text to us before your session in order for us to prepare the teleprompter.
Planning & storyboarding your video

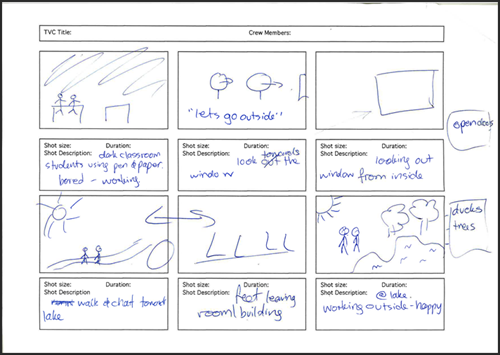
When making a video, one the most important elements is to plan your video using a storyboard technique.
A 'storyboard' is a "graphic representation of how your video will unfold, shot by shot" (Video Maker Tips, 2014). The traditional structure of a storyboard is made up of squares with hand drawn illustrations depicting each shot with notes about what is going to happen in the scene, including any narrations. Each square is a shot or scene. Storyboards do not have to be detailed, but are designed to help you think through the process of creating a video.
By using a storyboard as the first step in your video production process, you are able to:
- share your vision visually;
- prepare for elements of your production phase (identifying scene, props etc);
- save you time during the post-production phase by ordering your collection of shots.
Click here to download a template storyboard or script/narration document.
References
Video maker Tips. (2014). What is a storyboard and why do you need one? Retrieved from http://goanimate.com/video-maker-tips/what-is-a-storyboard-and-why-do-you-need-one/
3 Create a Presentation
Presentation Software
If you will be projecting a presentation on the screen using the overhead projector or TV screen you may wish to explore these popular presentation software packages.
| Powerpoint | Free | |
| Keynote (iOS) | Free | |
| Google Slides | Free |
Presentation Templates
Presentations with dark backgrounds and extra-large white fonts are easiest to see.
- Powerpoint Template (blue)A basic Powerpoint Template (16:9) in dark blue.
- Powerpoint Template (black)A basic Powerpoint Template (16:9) in black.
4 Gather Presentation Resources & Props
Before you begin recording, make sure to gather any resources and props you may need, and arrange the space appropriately. The studio has the following resources available:
| A fake microphone |
| High table and two chairs (for interview setting) |
| A television screen |
| Presentation Clicker (ask for it when you collect the key) |
| Teleprompter (click here for more information) |
Do you have any suggestions for props? Please tell us in the suggestion box on the Welcome page or click here.
Pro Tip: Don't forget to dress appropriately for your presentation! Your wardrobe must be both context-appropriate and camera ready.
Edit the Video
5 Understand Your [Copy]Rights
Many digital works are available for inclusion in your video under a creative commons license. This video provides a broad overview of creative commons. Below you'll find links to websites for downloading works available under CC. For more information, visit the Creative Commons Web site.
Click here to go to the Creative Commons search engine.
6 Choose a Video-editing Application
Use video editing applications to edit your video, including adding additional sound, video, and still images. Popular video editing applications include:
| Software name | Download | Skills level required | Cost implications | Operating System |
| Movie Maker | Click here to download | Basic | Free | |
| iMovie | Click here to download | Basic | Free | |
| Filmora* | Click here to download | Basic | | Free |
|
| Adobe Premiere | Click here to download | Advanced |
* Note: The Filmora free download is only a trial version. You can do your editing on a trial version and then just export your final video on a permanent lisence that is installed on certain computers on campus, or work on a computer with a more permanent lisence.
Luckily for you, ADS has 10 registered copies of the programme available for staff and students in the ADS Reading Lab (SL301) to use to publish their video work without the watermark. Learn more HERE: http://filmora.wondershare.com/video-editor/
7 Add Sound
Download Sound Files
Download licensed or public domain sound for inclusion in your video. Popular download sites include:
| ccMixter | | | |
| iBeat | | | |
| Incompetech | | | |
| Sample Swap | | | |
| Sound Cloud | | | |
| TechnoAxe | | | |
| Vimeo | | | |
| Free Stock Music | | |
Edit Sound Files
You may wish to adapt or edit the sound files you download. Additionally, many applications allow you to create your own sound effects and even music. Popular sound creation/editing applications include:
| Audacity | Free | |
| Audiotool | Free | |
| Audition | ||
| Acoustica | | Free |
|
| GarageBand | | Free |
